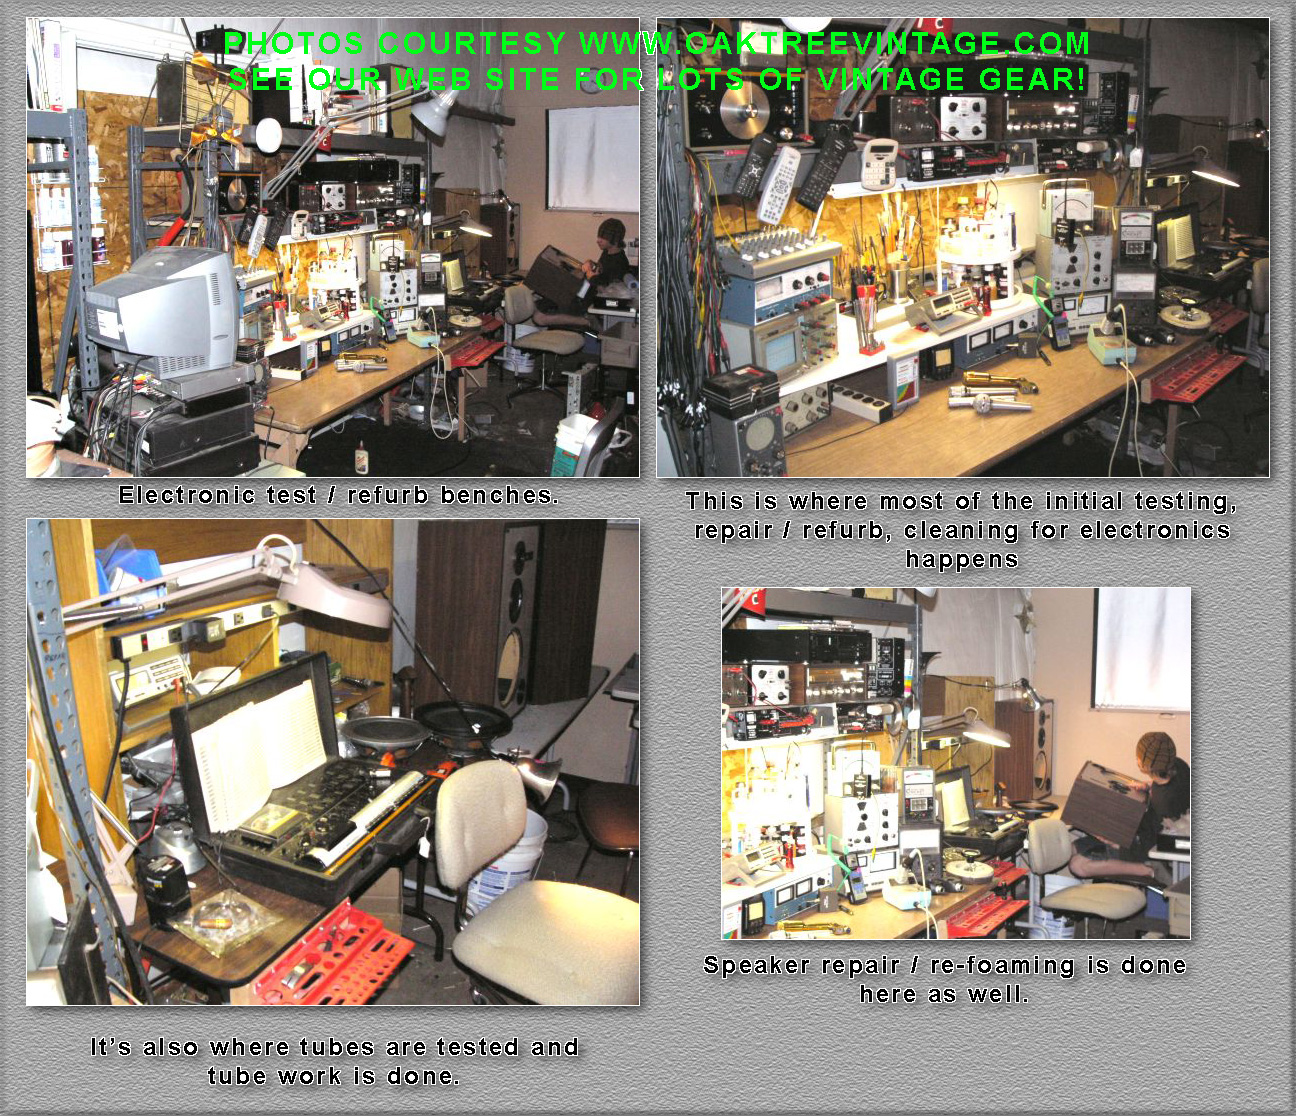
Our Testing and restoration methods:
Receivers / Tuner /
Pre-amps
Power-amps,
Guitar Amps:.JPG)
.JPG)
Initial check-in and test for basic function:
First check to see that the unit is set for correct North American
Voltage. Then we pull the cover / housing and do a visual check for
burned components, bad fuses, swollen / leaking capacitors, excessive
grime, critters (yes we've found a few mouse nests) and dust or any
other obviously problems. We then check for a 'hot
chassis', meaning does it have voltage between the chassis, face, knobs
etc to ground. We do this because we once had a unit that an 'amateur'
had worked on at some time in the past, prior to arriving to us. This
person had erroneously connected a wire to a 'hot lug' of the power
switch to the chassis, instead of the correct location. Somehow when the
unit was powered off, it had 120VAC going to the chassis. Our tech had
his hand on the chassis, and reached up to adjust his articulating arm,
bench light. He had a full 120 Volts pass from one hand, completely thru
him to his other hand. Fortunately, somehow, other than sore arms for a
couple of days, he survived unscathed, but technically that was a
'lethal' situation and could have had, and probably should have had much
more serious results. We 'dodged a bullet'.
If nothing raises alarm we power up slowly on
a Vari-AC to check for any early excessive current draw. At full current
after about 10 minutes, we then check for excessive DC 'offset' at the
outputs before we connect any test speakers. We then check for AC noise at the
outputs. Assuming the unit passes to this point we then evaluate
condition of controls, panel lamps, output sine wave quality (using an
oscilloscope, an AF gen, appropriate dummy load and volt meter) noting
overall quality of the sine waves. Then and only then, do we feel
confident to connect to a speaker load for initial 'listening tests'. A
piece of gear that has an unusually heavy build up of dust, grease and
grime on the output devices and the rest of the circuitry will probably
get salvaged even if it does work, as an excessive amount of grime means
that the components have been allowed to run hot, thus shortening their
life span. Heat is the number one killer of electronics and parts that
have an excessive amount of dirt and grime build-up cannot dissipate
heat adequately. In addition if you can see that much dirt
on the surface, inevitably it has gotten in places where it can’t be
cleaned and may cause future problems. Units that have been used in
bars, kitchens, garages and shops or in environments with heavy smokers
and or lots of dust are to be suspect.
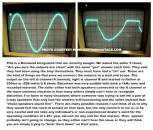
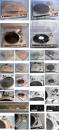
Here is a recent example of two identical models that came in on
trade from the same person. He had 'taken the gamble' and purchased one,
from a fleeeebay seller who of course said that the unit 'tested fine',
'work as intended', 'sound great', blah, blah blah... He had read about
the 'stellar' performance units we had previously had of the same model,
and once it arrived, felt that it fell far short sonically, but couldn't
'put a finger' on why. He then tried a second unit from another seller,
stating similar condition, with the same results. We don't normally do
outside repairs, but since I knew him, and he was local, we agreed to
take a look at them, and if nothing else, work a potential trade-in
towards one of our 'refurbished' units. After establishing a basic
'state of health', we found that while both were running 'hot', one was
running 'scalding' hot (220 plus degrees! at the heat sink). They
both did work, and the tuners and all basic functions were there, and
they each didn't sound necessarily offensive, but upon further testing
into a dummy load and on a scope, we found bias issues. When a basic
bias adjustment was initially attempted, neither unit would respond, no
matter how far the adjustment pot was 'racked' in either direction with
one idling at 63ma!!!.
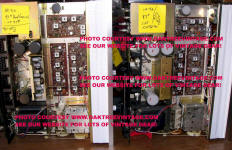 <--photos of Sansui units
Both units required EXTENSIVE driver board rebuilds (2-3 hours each of
tech time for new capacitors and driver transistors). There were other
typical issues that were also addressed, but once done we were able to
decrease the temperature down to about 'room temperature' on both. At
220+ degrees at idle, they wouldn't have lasted long, to say the least.
Just FYI when you're considering the unit from an 'amateur' electronics
seller that says 'its all good'.
Once we do an initial check-in we vacuum, use compressed air, and
brushes to remove all the dust, dirt and grime from the inside of the
unit. We strip the unit to the level of cleaning it’s controls and
switches, which sometimes even means individually removing the controls
from the circuit board completely to do a thorough cleaning.
It can sometimes take up to 2 hours just to gain access to clean a units
controls.
 We also check for obvious past repairs that may not have been done
“professionally”. We next check and / or replace any burned or
intermittent panel / pilot / meter / indicator lamps. Next any internal
memory back-up batteries / capacitors are checked or replaced. We
inspect for any “cold” or loose solder joints especially on the input /
output jacks and ground / ground-chassis, pots and switches or any other
parts that might have force or flexion applied to them. RCA jacks are
notorious for developing loose solder joints especially on gear newer
than 15 years or so due to manufactures choosing to solder jacks
en-mass directly to the circuit boards to save money. Cheaper as it may
be, it’s a terrible design that will inevitably fail after just a few
uses. The same goes for abandoning the use of quality control pots that
use a nut to secure it to the chassis / face-plate. Many units
manufacturers switched to using control potentiometers that are soldered
to the circuit boards and simply stuck through a hole in the face
with no “shaft nut” to secure it. Every time you manipulate the control
you stress the solder joint. Some fare well,
but most do not over just a few
years of use. Two terrible designs that are common on the vast majority
of gear manufactured after the early 1980’s but I just had to get on the
“Soap Box” about them. We also proactively
re-flow most solder joints associated with 'heat' producing components
such as 'voltage regulators' and 'power resistors' as even though they
may not 'yet' be completely bad, they are almost always in some 'state
of going bad soon'. We also check for transistors / diodes /
semiconductors with 'black or green legs'.
We also check for obvious past repairs that may not have been done
“professionally”. We next check and / or replace any burned or
intermittent panel / pilot / meter / indicator lamps. Next any internal
memory back-up batteries / capacitors are checked or replaced. We
inspect for any “cold” or loose solder joints especially on the input /
output jacks and ground / ground-chassis, pots and switches or any other
parts that might have force or flexion applied to them. RCA jacks are
notorious for developing loose solder joints especially on gear newer
than 15 years or so due to manufactures choosing to solder jacks
en-mass directly to the circuit boards to save money. Cheaper as it may
be, it’s a terrible design that will inevitably fail after just a few
uses. The same goes for abandoning the use of quality control pots that
use a nut to secure it to the chassis / face-plate. Many units
manufacturers switched to using control potentiometers that are soldered
to the circuit boards and simply stuck through a hole in the face
with no “shaft nut” to secure it. Every time you manipulate the control
you stress the solder joint. Some fare well,
but most do not over just a few
years of use. Two terrible designs that are common on the vast majority
of gear manufactured after the early 1980’s but I just had to get on the
“Soap Box” about them. We also proactively
re-flow most solder joints associated with 'heat' producing components
such as 'voltage regulators' and 'power resistors' as even though they
may not 'yet' be completely bad, they are almost always in some 'state
of going bad soon'. We also check for transistors / diodes /
semiconductors with 'black or green legs'.
 This is an issue that we are
seeing more and more often as time marches on, especially to some
transistors. This is oxidation that is happening to the metal leads,
that then migrates up into the epoxy body of the device. If it migrates
far enough in (and it sometimes does), it can / will compromise the
internal contact with the devices substrate thus compromising
conductance. Often this can be deduced by physically manipulating a part
that is being intermittent, or by heating / cooling them. Sometimes they
are past that and just don't ever work and simply need to be replaced
along with any others exhibiting 'black or green' oxidation.
This is an issue that we are
seeing more and more often as time marches on, especially to some
transistors. This is oxidation that is happening to the metal leads,
that then migrates up into the epoxy body of the device. If it migrates
far enough in (and it sometimes does), it can / will compromise the
internal contact with the devices substrate thus compromising
conductance. Often this can be deduced by physically manipulating a part
that is being intermittent, or by heating / cooling them. Sometimes they
are past that and just don't ever work and simply need to be replaced
along with any others exhibiting 'black or green' oxidation.
We check for a particular 'glue / epoxy' that was often
used in the 70's and 80's to secure heavier devices such as larger
electrolytic capacitors & voltage regulator heatsinks. In some instances
it has become conductive and must be removed / replaced so as not to
compromise the performance of the circuit.
We check electrolytic capacitors for any signs of
leakage (physical / chemical, not electronic), bulging, splitting etc.
We also often check them electronically for proper capacitance, ESR and
we can test leakage up to 600Volts! If deemed necessary, we also can do
a leakage test that actually looks at the rate of leakage / bleed off.
As time marches on, we are having to be aware of the
above points more and more often, which unfortunately, increases end
unit prices due to additional tech time / parts resources. Fortunately
however, that means that most of those part addressed with not likely be
an issue for another 2-3 dozen years.
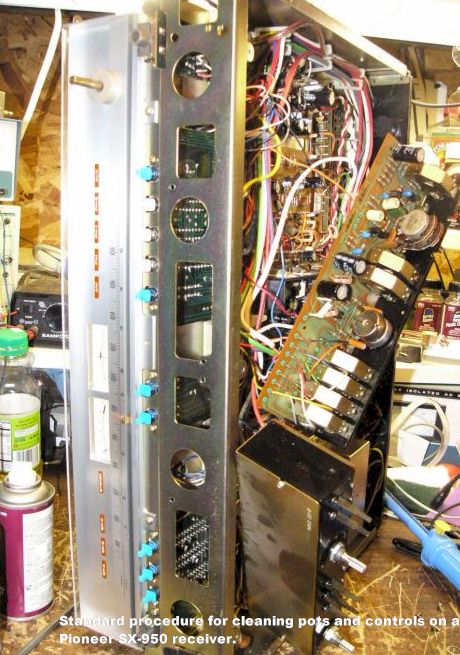
We check tuner dial cords / mechanisms for
freedom of motion, frayed tuner string, binding string at flywheel,
string slip and alignment, replacing where necessary. We also check
tuners on all bands for quality and re-align the tuner "front-end" as
most have drifted in performance due to semiconductor age, wear and
dirt. Next face plates / housings / patch-bays and knobs
are painstakingly cleaned and polished. Entire unit is detailed to look
as close to new as practical. Bent control shafts are straightened.
Questionable or stiff AC cords are replaced. Wood cabinets are oiled.
 Loose trim is repaired. The unit is then re-tested for all functions and
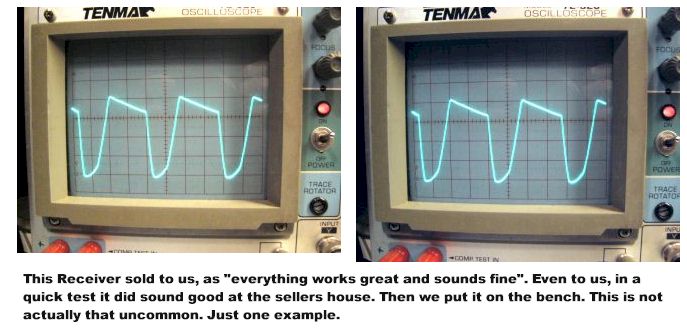
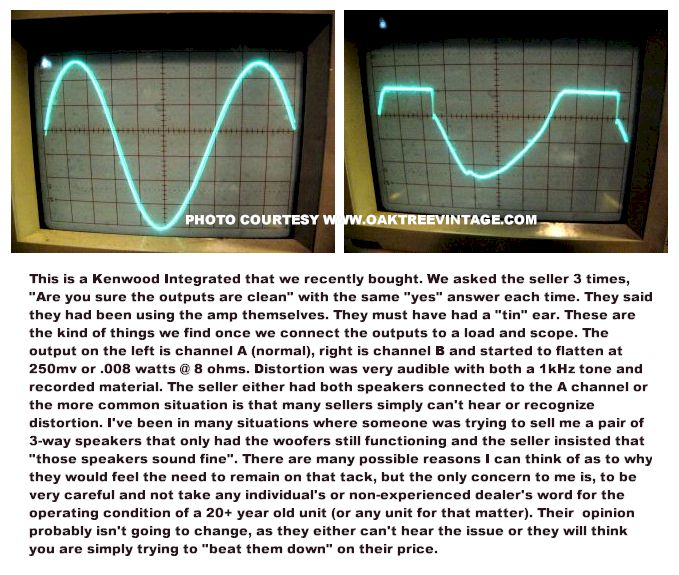
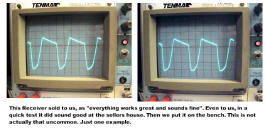
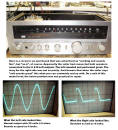
output quality. Our test for output quality and control
potentiometer cleanliness is not simple listening through a set of
speakers. We 'look' at the sine waves to make sure the controls are
clean. We test one side / amplifier at a time currently. These tests are
not to test for "original spec" or deviation from that, but to test the
overall health of the pre-amp / power-amp section. We connect the
outputs individually to a “Static /
brick-wall load” that can vary from 0-32 ohms.
Most amplifiers are tested at both 4 & 8 ohms. We first do an 8-ohm
test. In addition to the “dummy (static) load” we connect a calibrated digital
volt meter and an oscilloscope to the outputs. To the inputs we connect
a sine-wave generator producing a 1 kHz tone with .775 volts output*. We
bring the amplifier slowly up to “clip” or to it’s power rails
noting that it hits both rails simultaneously. If it is hitting one rail
in advance of the other it indicates a bias problem which means that the
output devices are either over biased or under biased and will need to
be adjusted if practical, or if there's a defective part, it is replaced
if practical.
Loose trim is repaired. The unit is then re-tested for all functions and
output quality. Our test for output quality and control
potentiometer cleanliness is not simple listening through a set of
speakers. We 'look' at the sine waves to make sure the controls are
clean. We test one side / amplifier at a time currently. These tests are
not to test for "original spec" or deviation from that, but to test the
overall health of the pre-amp / power-amp section. We connect the
outputs individually to a “Static /
brick-wall load” that can vary from 0-32 ohms.
Most amplifiers are tested at both 4 & 8 ohms. We first do an 8-ohm
test. In addition to the “dummy (static) load” we connect a calibrated digital
volt meter and an oscilloscope to the outputs. To the inputs we connect
a sine-wave generator producing a 1 kHz tone with .775 volts output*. We
bring the amplifier slowly up to “clip” or to it’s power rails
noting that it hits both rails simultaneously. If it is hitting one rail
in advance of the other it indicates a bias problem which means that the
output devices are either over biased or under biased and will need to
be adjusted if practical, or if there's a defective part, it is replaced
if practical.
 Either problem can and usually does result in outputs either running too
hot (which shortens their life drastically) or running too cold which
will usually result in a “mushy” sound with no "punch". If the signal
looks good we note the voltage output and do the math to figure "peak"
wattage (you can use the voltage / load figures to deduce RMS output if
you wish). We then lower the load impedance to 4 ohms and repeat the
tests and then on to 2 ohms if the amplifier is designed to run that
low. We also manipulate the controls with the sine-wave to check for
dirt induced static as smaller amounts will show up readily on the
scope, but may not be heard readily with your ears. If there’s a problem
we re-clean or replace the controls and re-test. We then re-assemble the
unit completely and it goes to another test bench. Here it is hooked to
a signal (usually utilizing the tuner with a quality antenna) and to a
pair of speakers. All the tone controls are maxed and the
Loudness control (if available) is engaged. It is then “burned-in” for a
period of not less than 12 hours at a moderate volume ( and sometimes up
to 72 hours) to check for any intermittent / heat related problems. Once
it passes all of the above tests it is tagged and bagged to await
shipment. (*We choose the “1 kHz into one channel at a time” testing
method as we believe it provides greater accuracy as to the health of
each channels output section. The alternative and other extreme would be
to load both channels simultaneously with full bandwidth pink noise or
1k and then do the measurements. It is difficult, if not almost
impossible to tell when pink noise is truly clipping and you can’t check
potentiometer condition using this technique. While the latter technique
would put the power supply to a more difficult test, outputs are more
likely to have issues than power supplies. Neither test is by any
stretch of the imagination “real world”, but the 1 kHz lets us get a
good bench mark of the performance and check for control condition /
quality. The published rating of the amp will usually be about 50-80% of
what we will measure it using our method. It would be 1 to 2 times
what you would see on the bench using the pink noise method. These
methods can be subject to modification.)
Either problem can and usually does result in outputs either running too
hot (which shortens their life drastically) or running too cold which
will usually result in a “mushy” sound with no "punch". If the signal
looks good we note the voltage output and do the math to figure "peak"
wattage (you can use the voltage / load figures to deduce RMS output if
you wish). We then lower the load impedance to 4 ohms and repeat the
tests and then on to 2 ohms if the amplifier is designed to run that
low. We also manipulate the controls with the sine-wave to check for
dirt induced static as smaller amounts will show up readily on the
scope, but may not be heard readily with your ears. If there’s a problem
we re-clean or replace the controls and re-test. We then re-assemble the
unit completely and it goes to another test bench. Here it is hooked to
a signal (usually utilizing the tuner with a quality antenna) and to a
pair of speakers. All the tone controls are maxed and the
Loudness control (if available) is engaged. It is then “burned-in” for a
period of not less than 12 hours at a moderate volume ( and sometimes up
to 72 hours) to check for any intermittent / heat related problems. Once
it passes all of the above tests it is tagged and bagged to await
shipment. (*We choose the “1 kHz into one channel at a time” testing
method as we believe it provides greater accuracy as to the health of
each channels output section. The alternative and other extreme would be
to load both channels simultaneously with full bandwidth pink noise or
1k and then do the measurements. It is difficult, if not almost
impossible to tell when pink noise is truly clipping and you can’t check
potentiometer condition using this technique. While the latter technique
would put the power supply to a more difficult test, outputs are more
likely to have issues than power supplies. Neither test is by any
stretch of the imagination “real world”, but the 1 kHz lets us get a
good bench mark of the performance and check for control condition /
quality. The published rating of the amp will usually be about 50-80% of
what we will measure it using our method. It would be 1 to 2 times
what you would see on the bench using the pink noise method. These
methods can be subject to modification.)
Guitar amps get most of the same procedures listed above, but in
addition we check, record
and/or replace all the tubes (where applicable) and test / replace all
electrolytic capacitors, especially the filter caps. Reverb tanks are
checked for any internal damage, all fasteners are checked
for tightness, speakers are tested for quality / problems, cabinets are
checked for soundness and amp is test played extensively for sound
quality, tone and gain. Definitely one of the more fun parts of the job.
Tape Decks
(Cassette, 8-Track, Reel to Reel, etc):
Initial check-in and test for basic
function: First check to see that the unit is set for correct North
American Voltage. Then we pull the cover / housing and do a visual
check for burned components, bad fuses, conductive glue on circuit
board components, black or green legged diodes and transistors,
‘physically’ leaky capacitors, capacitors with shrunken wrapping,
compromised wiring, overheated / burned resistors or other circuit board
components, disintegrated / melted or otherwise out of place belts,
rodent infestations (yes, we’ve seen it multiple times),
excessive grime and dust or any
other obvious problems. We also check for obvious past repairs that
may not have been done “professionally”. Assuming the unit passes to this point,
and assuming that the rubber drive components appear to be at least
'initially servicable', we then
evaluate basic function of the deck playing first a generic tape through
the transport to make sure it doesn’t have a habit of eating tape and to
check to what degree the transport is engaging all of it’s functions
ESPECIALLY 'Fast Wind', and if equipped with 'Auto-Reverse' via a
'rotating head mechanism' that the head is rotating. We also not if the
pinch roller has divots or other issues and that it's arm assembly is
pivoting freely or to what degree it isn't. We then
check playback with test tapes noting sound quality on both channels and
accuracy of speed. We then attempt a simple record test to see if the
unit is at least imprinting a signal onto the tape and then if it will
erase it. At this point we will commonly check the
power supply board to make sure it's producing all the proper voltages
at various test points / outputs / inputs. AC floor noise
measured and noted. We next check and / or replace any burned or
intermittent panel / pilot / meter / indicator lamps (commonly we replace
them 'proactively', regardless if they currently function or not).
Once we do an initial check-in we use compressed air,
vacuum and brush to remove all the
loose dust from the inside of the unit. We strip the
unit to the level of cleaning it’s controls and switches, which
sometimes even means individually removing the controls from the
circuit board completely to do a thorough cleaning. It can sometimes
take up to 2 hours just to gain access to clean a units controls.
We'll also typically remove the transport from the
chassis (not always necessary, but often is) to service all the various
aspects of it. We
check and either re-condition or replace all rubber components.
The vast majority of the tape deck public thinks that by replacing the
belts, a tape deck can be made to run again. While belts do certainly
need to be addressed, there's also EQUALLY important, 'tires / rubber
wheels' (and I'm not talking about the pinch roller(s)) here. With only
a few exceptions, cassette decks utilize small, rubber rings / tires to
move the supply and take-up reels for both playback and Fast-Wind. Most
cassette decks will have at least one and we've seen up to 7!!! This is
critical and usually the most time consuming part of tape deck repairs.
While we stock many dozens of new, replacement tires,
it's only about 20% of the time that we have one that's correct off the
shelf. The vast majority of the time, we have to source multiple
examples before we find one that's adequate, modify one we have to an
acceptable level, fabricate one from scratch and / or recondition the
existing tires.
We’ve all seen what happens to a rubber pencil eraser after just a year
or two. It gets glazed on the surface and slick and will not erase
anything as it just slides across the paper. Or,
depending on how it was original vulcanized, rubber can revert back
to its original state, sort of a "gooey tar" substance
(most common on Pioneer products we've noticed. Nothing necessarily to
do with Pioneer as a manufacturer, but likely more to do with the
processes and methods employed by their rubber supplier / manufacturer). The same thing
happens to all the belts, tires, wheels and rollers in a tape deck or
VCR
 . Fortunately it takes longer than a year, but it does typically
appear after about 8-12 years. Even if a deck is left wrapped in
it’s original packing and never used it will likely meet the same fate.
In fact that would probably be worse than using a deck everyday. If a
deck is used very regularly the rubber parts seem to have less
opportunity to glaze up. We stock hundreds of belts and tires, but even
then we only have about a 20% (that’s one out of
5) chance of having or
even having access to the correct replacement rubber parts.
Manufacturers of rubber parts are supporting cassette, reel to reel and
8-track cartridge technology less and less all the time due to lack of
popularity / demand. Internal tires that are still potentially serviceable, are
resurfaced / reconditioned. If they are too far gone, they
can also be sent out
to be rebuilt (people that do that are 'few and far
between'). We clean and re-lubricate the transport
mechanism. This commonly requires a complete disassembly of the
transport mechanisms moving parts. Cleaning a transport on a reel to
reel can sometimes be akin to cleaning the dried grease from under a 20
year old automobile. Very commonly the lubes / grease has hardened and
must be scraped off parts. Many times, bushings will be "frozen" on a
shaft and must be heated just to separate the two parts before cleaning
can even begin. No amount of lubing over a varnished joint will bring it
back. They must be disassembled, cleaned of all old lube and correctly
re-lubed. Auto-Stop mechanism wires are disassembled
and new 300,000 or 500,000 silicone damping gel applied. Capstan's are cleaned / burnished. Flywheel bearings likely re-lubed.
. Fortunately it takes longer than a year, but it does typically
appear after about 8-12 years. Even if a deck is left wrapped in
it’s original packing and never used it will likely meet the same fate.
In fact that would probably be worse than using a deck everyday. If a
deck is used very regularly the rubber parts seem to have less
opportunity to glaze up. We stock hundreds of belts and tires, but even
then we only have about a 20% (that’s one out of
5) chance of having or
even having access to the correct replacement rubber parts.
Manufacturers of rubber parts are supporting cassette, reel to reel and
8-track cartridge technology less and less all the time due to lack of
popularity / demand. Internal tires that are still potentially serviceable, are
resurfaced / reconditioned. If they are too far gone, they
can also be sent out
to be rebuilt (people that do that are 'few and far
between'). We clean and re-lubricate the transport
mechanism. This commonly requires a complete disassembly of the
transport mechanisms moving parts. Cleaning a transport on a reel to
reel can sometimes be akin to cleaning the dried grease from under a 20
year old automobile. Very commonly the lubes / grease has hardened and
must be scraped off parts. Many times, bushings will be "frozen" on a
shaft and must be heated just to separate the two parts before cleaning
can even begin. No amount of lubing over a varnished joint will bring it
back. They must be disassembled, cleaned of all old lube and correctly
re-lubed. Auto-Stop mechanism wires are disassembled
and new 300,000 or 500,000 silicone damping gel applied. Capstan's are cleaned / burnished. Flywheel bearings likely re-lubed.
One issue specific and common to many of Akai Reel to
Reel decks are disintegrated 'transport cams'
 on Akai models such as, but not limited to,
Akai
1722W, 1722-II, X-150D, X-220D, X-1800SD,
4000, 4000DS, 4000DB, GX-4000 and many more.
on Akai models such as, but not limited to,
Akai
1722W, 1722-II, X-150D, X-220D, X-1800SD,
4000, 4000DS, 4000DB, GX-4000 and many more.
We inspect for any “cold” or loose solder joints especially on the input
/ output jacks and ground / ground-chassis, pots and switches or any
other parts that might have force or flexion applied to them. RCA jacks
are notorious for developing loose solder joints especially on gear
newer than 15 years or so due to manufactures choosing to solder jacks
en-mass directly to the circuit boards to save money. Cheaper as it may
be, it’s a terrible design that will inevitably fail after just a few
uses. The same goes for abandoning the use of quality control pots that
use a nut to secure it to the chassis / face-plate. Many units
manufacturers switched to using control potentiometers that are soldered
to the circuit boards and simply stuck through a hole in the face
with no “shaft nut” to secure it. Every time you manipulate the control
you stress the solder joint. Some fare well,
but most do not over just a few
years of use. Two terrible designs that are common on the vast majority
of gear manufactured after the early 1980’s but I just had to get on the
“Soap Box” about them. We also proactively
re-flow most solder joints associated with 'heat' producing components
such as 'voltage regulators' and 'power resistors' as even though they
may not 'yet' be completely bad, they are almost always in some 'state
of going bad soon'. We check the power
supply and make sure the voltages its producing is within spec. We then clean the heads and adjust head azimuth
w/ a 10kHz, factory azimuth tape and an oscilloscope for maximum
accuracy, phasing, output and sound quality. We check
with a 400Hz and 700Hz @ 0dB tape to check PB and Meter levels, and to
check for distortion (we're always listening / looking for that). Next we completely
demagnetize the heads, capstan and entire tape transport. Reel brakes
are adjusted on reel-to-reel decks. If the service is on an 8-track, we
will disassemble the track indicator and head track slide, to clean and
re-lube and burnish or re-spring the contacts for trouble free service.
We will also use factory 8-track service tapes to adjust for cross-talk
which is a common problem. 8-Tracks also commonly will have their
capstan flywheels remove to remove the old varnished lube, and re-lube.
Transport has any necessary adjustments made and lubricated where
applicable.
If the unit being serviced / refurbished / restored
is a Reel to Reel deck, reel hub force is measured and adjusted, as well
as tension arm springs, pinch roller force and motor 'back torque' using
appropriate scales (commonly in 'Dynes' or 'Newtons').
Most 'record capable' types of tape decks will need their internal
'record / play' slide switch extensively cleaned to eliminate many
issues.
.JPG)
.JPG)
Next we test record using a fresh, high quality tape looking
for large discrepancies in record / play-back meter levels. We also
re-test for speed accuracy and make any necessary adjustments that are
available. WE HAVE NEVER DONE THE INITIAL TESTS ON ANY TAPE DECK WHERE
WE HAD A DECK BE "ON SPEED", OR EVEN A USEABLE LEVEL OF "CLOSE". R2R's
are usually 20-120 cycles low at 1kHz, but can occasionally be sharp by
as much as 30 cycles (some late 60's-early 70's decks have actually been
150-300 cycles low!). Consistently, or at least 95+ % of the time,
cassette decks are 35-45 cycles over 1k after reaching operating
temperature. All the tape deck techs here (including myself) are
musicians and know what this means. This means that if you try and use a
cassette deck (or any tape deck for that matter) that has not been speed
checked, and it is 35-45 cycles "sharp" @ 1k, that is almost a entire
"half step" sharp (ie; if a song was recorded in the key of
"B", it will play back at a "C"). Try and match
with your old studio tapes to your voice or currently tuned instrument
at A440. Ain't gonna happen! We strive to adjust our decks to within +-
1cycle @ 1kHz and are usually successful. This requires a "factory" or
verified test tone tape, a calibrated frequency counter, lots of
patience and the knowledge of how to make the necessary internal
adjustments.
Next face plates / housings / patch-bays and knobs are painstakingly
cleaned and polished. Entire unit is detailed to look as close to new as
practical. Bent control shafts are straightened. Questionable or stiff
AC cords are replaced. Wood cabinets are oiled. Loose trim is repaired.
The unit is then re-tested for all functions.
Once the mechanical items and issues are addressed, the internal
controls are set to optimize meter levels, PB and Rec levels, and any
other levels that are practical. We then do many test recordings using
fresh, new (we have a stock of sealed, never used tape for our own use)
tape. Playback is tested with known quality and factory test tapes.
Cross-talk is checked with a factory 'cross-talk' test tape. If the deck
is a "record capable" unit, then recordings are made on both Normal and
Hi-Bias tapes for comparisons and are also made at multiple signal
levels and with the decks NR features on and off. We look for dB level
similarities upon playback and utilize an oscilloscope to monitor the
deviation of the original 1k signal and the recorded signal on each tape
type. We also then make multiple recordings from CD material that are
audiophile worthy (many CD's aren't). As with all our units, the entire
"pre-test" and "post-test" procedure is logged in detail in a report we
keep on file. Once the above is completed (and I've
probably left out a few steps) by our tech(s), it goes to me to have
final testing / auditioning. I will complete a 'post service' check
sheet. More often than not, a unit will require additional 'tweeking' /
re-visiting by the tech 2-5 times before I finally sign off on it (I've
been know to 'terminally fail' units even after 4-5 tech visits if it
doesn't perform to my standard, and to a level that I think justifies
our values and will give good service for MANY years or decades to
come). The above steps and procedures can take from 10-40 hours to
complete (typically 16-24).
(PS. If you're looking at auctions for 20+ year old units, and someone
says, "this tape deck (substitute VCR, Turntable, CD player, Clock or
other electro-mechanical device) has never been used or taken out of the
box" or, "was used for a couple of hours when new, and has been in the
closet ever since" those are BAD THINGS! Probably one of the worst
things that can happen to an electro-mechanical unit such as a tape
deck, turntable, VCR, etc. is for it not to get used. Just like a car
that runs bad after it sits for a few weeks or months, a stereo
component can have similar symptoms. Think of how bad the car would run
if it hadn't been started in 15 or 20 years! On tape decks, Turntables,
VCR's etc. that have been allowed to sit unused, the rubber parts /
belts stiffen into one shape and the lubes congeal or worse yet turn to
varnish, "freezing" moving parts solid! So the next time you hear, "its
new in the box and was never used" when referring to an
electro-mechanical device, think twice and "run like h3ll".)
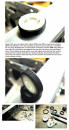
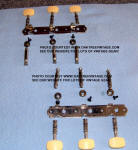
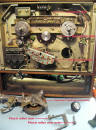 Photo is of a Teac 4010S having typical Main Capstan Belt change and Pinch
Roller Arm re-lube operation. Not an operation too many folks want to
undertake. This is just a couple steps of MANY that is required to try
to get most decks back to a level of condition that will allow it to
operate for any length of time! Just FYI.
Photo is of a Teac 4010S having typical Main Capstan Belt change and Pinch
Roller Arm re-lube operation. Not an operation too many folks want to
undertake. This is just a couple steps of MANY that is required to try
to get most decks back to a level of condition that will allow it to
operate for any length of time! Just FYI.
Speakers:
Each speaker first gets a visual inspection for
bad surrounds, dust cap condition, cabinet joint integrity, connector
condition etc. After some pre-testing of the individual drivers, any
speaker that comes in with drivers (especially woofers) featuring foam
surrounds has the foam replaced on those drivers, except in very rare
cases. We do this regardless of how "good" the foam may still "look" on
a driver. We learned this the hard way as that long ago when we first
started in the "vintage" biz, we would "pass" speaker with drivers that
had foam that "looked" fine. 100% of those 6 or 7 times we sold speakers
that way, the customer called within a day or two of using them to let
us know the foam had failed, so they had to be shipped back for
re-foaming anyway. (By the way, the truly 'correct' method of
re-foaming / replacing speaker surrounds, especially on drivers larger
than about 6", and on certain drivers smaller than that, is to 'shim the
voice coil'. This requires removing the dust cap. Yes, its difficult
and potentially damaging, but you just need to be careful and
methodical. If that is not done, there are two alternative methods to
'centering' to voice coil. The first is 'by feel'. VERY inaccurate and
generally only successful by SHEER LUCK. Kind of like setting the timing
on your engine 'by ear'. Yes, you MIGHT get close, and the end result
MIGHT be a better running engine, but it probably won't be nearly as
correct as using the correct equipment. The other method of centering
the voice coil involves sending a VERY low frequency tone (DC or
approaching DC) to the voice coil to keep it centered in the gap and
keeping it there while the glue sets up / dries. Firstly, few folks have
the ability or equipment necessary to do this, and secondly, I wouldn't
want DC, even at lower power levels, to be sent to my voice coils for
extended periods of time to 'cook them'. (an alternative method to the
'DC' version is to raise the frequency to as much as 400, but then you
have a 'vibrating' cone that makes 'weighting' the foam all the way down
on the cone nearly impossible, which will likely result in a glue joint
with 'gaps' and unnecessary glue mass). I am amazed at the lack of
credence given to this issue with firstly the folks selling re-foam
kits, and secondly the general public installing them. A few years ago,
most kits and instructions would include the necessary shims,
replacement dust caps, and information on how to remove your dust caps,
shim the voice coils and replace the dust caps. Now I am not aware of
any that do! Maybe it was causing too many 'customer service' issues /
'call backs' and maybe folks were ruining their drivers removing the
dust caps. I can only speculate but its a shame, as its a disservice
and a misfortune that probably many drivers are likely 'ruined' by
incorrect re-foam jobs. There's not a 'pretty' fix I suppose, but if
doing the job correctly is beyond someone's capability, then the drivers
should be sent to a 'competent' repair shop (competent meaning a shop
that correctly 'shims the voice coils') and have them done there)
The units are then disassembled where practical to inspect for physical
condition of drivers, crossovers and type / quantity
dampening material. You would be
surprised at what we’ve found in some speaker cabinets. Everything from
rusty speaker frames and motors, exploded caps in the cross-over that
have sprayed “shrapnel” throughout the inside of the cabinet, charred /
burned crossover networks (speaker may still work, with a crossover that
looks like its been barbequed), mouse nests and once, even a Black
Widows web with resident about the size of a quarter still alive and
well. Not sure what she had been eating in there.
We next check for driver spider (not the same as the above mentioned,
but an actual part of a speaker) attachment and lead wire integrity. We
also check for loose internal wiring / connections. Drivers are then
re-installed adding or replacing gasket material with fresh. We also add
fresh gasketing material to the rear panels / baffle boards where
applicable. Once the drivers are re-installed the entire speaker system
/ cabinet is 'vibration' tested with 'drop tests', mallets and an
amplified AF sweep (this is where we almost always find issues, many of
where were probably there from the original manufacturer!). Next each
speaker is individually tested. We use a pink noise generator as testing
with music material from a CD or other similar source will many times
not alert you to Tweeter, Super Tweeter open coil issues or other
"balance" problems. The PN generator
will also alert us to any 'phase' issues, not only between the L & R
drivers, but within a cabinet, between woofer and midrange. This is one
place that I commonly have to 'triple and quadruple check' my
technicians on, as its any easy one to overlook on 're-assembly' after
they've spent hours working on a speaker. The PN generator is also how we find most issues
with driver attenuators both prior to and after cleaning (and pretty much
all have contact issues prior to our refurb).
Many speakers may sound OK
with recorded material, but can have their upper-most-frequency
drivers
bad. We then test the entire speaker cabinet with it’s components
in-place with a sweep tone generator at low, medium and high volumes to
check for any buzzing, rattling, extraneous vibrations,
air leaks / 'whistles' (commonly found from 80Hz down to 20Hz or so) or sympathetic
harmonic tones. We
recently had a pair of Pioneer HPM-100's that we came in with three
'hidden / not-apparent' issues. One was a 'blown apart' capacitor on the
crossover (all the drivers still functioned, and that would not have
been discovered, had we disassembled the speaker), and the second issue
was one of the tweeters had a 'buzz' we found during a 'sweep' from
approx 2.3kHz down to about 900Hz. We substituted another (after
ordering from an on-line auction seller (you guess which 'on-line'
auction) and waiting for it to arrive), and it also had a similar
'buzz'. We were then forced to take one from a Pioneer HPM-100 in our
personal collection, and yes, it worked fine. The EXACT same scenario
happened with one of the 'Super Tweeters', except that it worked
'intermittently' when removed and had the case 'flexed'. That cost's us
over $200 just in tweeters, and while most folks may never have noticed
the issue, IT WASN'T RIGHT, and had to be addressed. We also replaced
the crossover (actually was quicker and easier to replace in its
entirety, then to just replace the blown cap).
We then test both speakers as complete assemblies with
pink / white noise to check for driver balance between the two cabinets.
This is not only an audible test, but we are able to view the results
with our 1/3 octave, 31 band RTA with calibrated mic that registers
20-20kHz. Next a number of recorded selections / cuts for sound quality
(another fun part of the job).
Entire unit is then detailed to look as close to new as practical. New,
felt feet are usually installed and any grill issues are rectified as
practical. Where applicable we oil wood cabinets, lightly repair
veneer, then bag and tag them to await packing (which is very difficult
to do correctly) for safe transit for shipment.
Recent and past speaker technicians include Camerion Gholson, Mark
Vandergift, Shane Thurston and John
Wright.
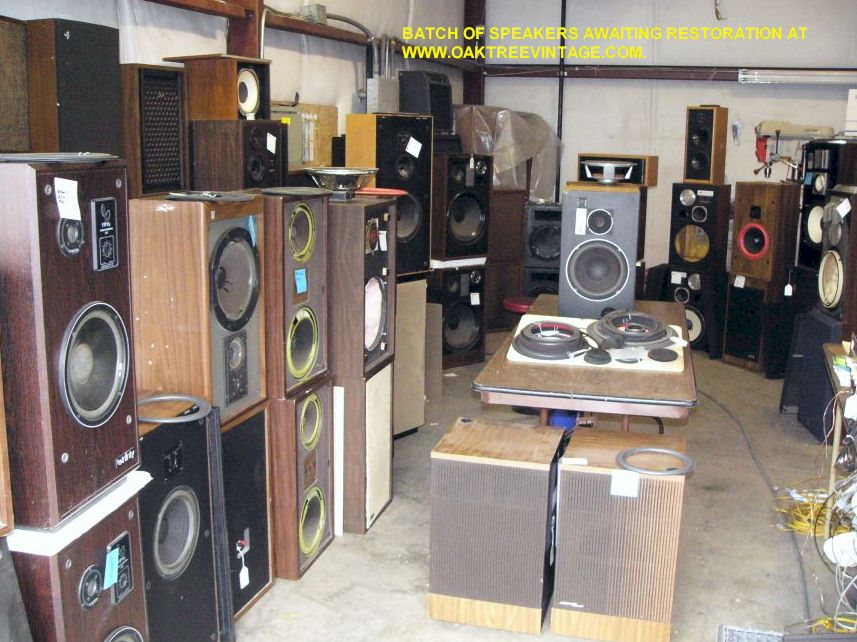
(BATCH OF SPEAKERS AWAITING RESTORATION)
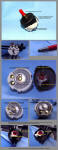
Turntables:
We first do a visual check of the table and
cartridge / stylus if applicable. If it’s a belt drive table we see if
the belt is still intact, missing or on occasion a natural rubber belt
will have disintegrated and wrapped itself around the motor capstan thus
burning up the motor as it could no longer spin due to the excess rubber
around it (we recently had a Philips turntable with this condition.
Fortunately the motor was still fine once the rubber ‘goo’ was cleaned /
removed and motor was re-lubed).
We check the tone-arm Gimbal bearing for freedom of movement and the arm
lift mechanism for smooth operation.
We check the ‘oil / fluid damped’ cuing for correct lift / set-down
speed, and if necessary, disassemble, clean and re-invigorate with
100,000, 300,000 or 500,000 silicone damping gel (post tests determine
if the gel weight is correct).
We then remove the platter to measure for a new belt and to lubricate
the motor, to check / replace any thrust bearings, and clean and
re-lubricate the spindle bearing.
We inspect, clean and re-lube any ‘auto-arm’ mechanics. This is usually
the most time consuming and ‘risky’ part of any turntable restoration.
Most are ‘fairly complicated’ internal workings, with many moving parts
that react with other parts, dependent on MANY points to be clean and we
lubricated. We recently had one require 20+ hours to rehabilitate! More
typically they require 4-8 hours to address ‘auto-arm’ mechanics,
especially on ‘mid-1970’s’ tables and earlier.
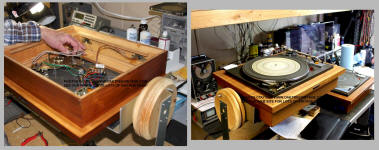
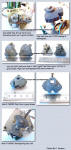
Pioneer PL-50 in restoration
process.
Once the mechanics are complete, we move on to the electronics / sonic
aspects.
We check the patch cables if permanently attached for condition, correct
resistance and replace / ‘up-grade’ where necessary.
If the patch cables / interconnect cables are ‘detachable’, we check the
integrity of the RCA jacks and re-flow solder joints as necessary.
We then make any necessary repairs to the base and when practical to the
dust cover and check it’s ‘hinge’ condition for joint issues and ability
to ‘hold’ dust cover up-right, adjusting if necessary, and when
possible.
We then install a “demo / test” cartridge / head-shell to put the table
and all it’s mechanisms through their paces and make any necessary
adjustments / parts replacements.
We then check for speed deviations, and correct where necessary /
practical / possible. While we strive to get an end result of 99%, +/-
1%, some tables will not allow closer than 95% speed accuracy.
Once we are satisfied the mechanics of the table are operating
correctly, we then test for proper and adequate ’60Hz Ground’ correcting
where necessary and improving it internally when possible.
We check, test and adjust any internal ‘muting’ micro / reed switches.
We then remove the “tester cartridge”, replacing it with the 'intended'
cartridge and optimizing the tone-arm for it checking ‘overhang’ and
adjusting through gram weight range, and making sure that ‘anti-skate’
calibration is similar to what it’s indicators state.
Then we use various test LP’s through speakers and a Dual-Trace
oscilloscope (on the mid-upper end price range tables we sell) to adjust
for anti-skating and cartridge cross-talk, tracking capability,
distortion from one channel to the next, and check for the cartridges
ability to track test records correctly on signals that are recorded
progressively louder. This is sometimes referred to as a ‘cartridge
obstacle course’. We may utilize a ‘blank slate’ record to adjust
anti-skating / bias (we’ve found it’s the most accurate way, even over
our O’scope / test record method). We also generally make notes as we go
through turntables recording what the end results of many of the
operations / tests were.
We then clean and polish the cabinet and dust cover as much as is
practical. When ‘monetarily practical’, dust covers are brought to near
new condition. Our guy is amazing with them.
Any dustcover
cracks (usually near the hinges)
are ‘welded’ for structural integrity. Entire unit is detailed to look
as close to new as possible / ‘monetarily practical’.
Any base / case issues are addressed prior to
re-assembly.
The tables are then bagged and tagged to await
packing (which is no easy task on a turntable) for shipment.
Turntables are one of the most difficult items to pack for safe shipment
and streamlined ‘re-set-up’ once the table arrives. That is for another
discussion / page.
Here's an example of what our turntable tech can do for the cosmetics
alone:
 (click on thumbnails to view photos)
(PS. If you're looking at auctions for 20+ year old units, and someone
says, "this tape deck (substitute VCR, Turntable or other
electro-mechanical device) has never been used or taken out of the box"
or, "was used for a couple of hours when new, and has been in the closet
ever since" those are BAD THINGS! Probably one of the worst things that
can happen to an electro-mechanical unit such as a tape deck, turntable,
VCR, etc. is for it not to get used. Just like a car that runs bad after
it sits for a few weeks or months, a stereo component can have similar
symptoms. Think of how bad the car would run if it hadn't been started
in 15 or 20 years! On tape decks, Turntables, VCR's etc. that have been
allowed to sit unused, the rubber parts / belts stiffen into one shape
and the lubes congeal or worse yet turn to varnish, "freezing" moving
parts solid! So the next time you hear, "its new in the box and was
never used" when referring to a mechanical device, think twice.)
Effects, Tuners, EQ’s and other
signal processors receive much of the same attention as the afore
mentioned units.
Vintage
radios:
We first do a visual inspection of the chassis
and cabinet. We then remove the chassis from the cabinet and do a visual
on the circuitry. We note weather the tubes that are in the sockets are
the correct units. Many people will stick a tube into a socket because
it fits and looked the same or it’s what they had around. That usually
spells smoke and disaster for the radio and certainly the tube and on
occasion the operator. We look and see if any of the filter capacitors
are swollen or leaky. We also inspect the AC cord to see if it’s safe
enough to at least test the unit with. If everything looks in order we
then apply AC power slowly to the chassis with a vari-ac noting
current draw. Sometimes by the time we get up to only 20 or 30 volts a
radio will start drawing ˝ - 2 amps and we know we have a problem.
Sometimes they will power up fine, but just buzz loudly. Sometimes they
start working with only the normal 60 cycle hum from an aged power
supply filter circuit. Once we deduce the initial electronic condition
of the chassis we then cut the power to the radio. We next remove all
the tubes, noting their correct location, test them, record the findings
on the tube with a sharpie or replace them where necessary (we also test
the new ones as we have had plenty that were bad out of the box). We
then clean the chassis completely including all the tube sockets. We
next check and almost always replace all the electrolytic filter
capacitors as well as checking all the other caps. We then clean all the
controls, switches, contacts and the variable tuning capacitor as well
as lubricating any moving parts. We then check the dial cord and
mechanism for integrity. We replace the pilot lamp and any other light
bulbs. We next install a new polarized AC cord and add a fuse for
safety. We then install all the tested / replaced tubes and again slowly
power the radio up through the vari-ac. After a couple of minutes
warming up at this point they usually sound like new! We then
disassemble the cabinet thoroughly cleaning the dial glass and
cleaning and polishing the housing and knobs where applicable. Entire
unit is detailed to look as close to new as practical. We then
re-assemble the entire radio and test play for at least 2 hours. They
are then bagged and tagged to await packaging for shipment.
Vintage electric fans:
Fans are very labor intensive
for us. That is why we are slow to replace sold units. Each fan
is initially tested, if they appear safe, for function, spin balance,
oscillation (if applicable), speed switch function and excessive rattles
or noise. We are also looking for speed and the amount of time the fan
may take to come up to speed. We then completely disassemble the fan and
all it’s components. We remove and clean any dried lubricant from the
oscillation mechanism (where applicable) and re-lubricate it. We also
try and replace any missing / broken parts to the oscillator. We then
clean and check the motor and it’s windings. We also check the brushes
at this point. We then check the condition of the speed / on-off switch
and repair as necessary. We next check the condition of the cage (blade
guard) inspecting for broken welds and straightening any bent sections.
We then either clean and polish the existing finish or often will sand
the unit down and refinish it. We will also at this time polish the
blades if they are not painted models. Entire unit is detailed to look
as close to new as practical. Once the finish work is complete we will
then reassemble the fan installing a new AC cord at that time. The blade
is then balanced for the most vibration-free operation possible. We will
then run the fan for at least an hour to make sure it is ready to go. We
then bag and tag it to await packing for shipment.
Guitars:
We have been doing
guitar set ups and repairs for almost 20 years for the general public.
Everyone has their idea of what “Plays great” means, but our set-up will
please 90% of Professional players. We know how to assess fret wear,
tuner condition, neck relief and electronics. We also are familiar with
the different aspects of tone and sound that make, model, strings,
pickups, wood and etc can have. We check for fret wear, adjust neck /
body angle if necessary, adjust neck relief to correct amount, adjust
pick-up height, saddle height, check nut grooves for
correctness, disassemble-clean-re-lube tuning
machines when applicable
 , install new strings, adjust intonation for installed
strings, check for excess buzzes and test play the instrument. We
also clean and polish the instrument, oil the fingerboard, polish the
frets, lube the tuners (if applicable) and make any necessary electronic
repairs. If a buyer prefers we can do a custom set-up for their playing
style and choice of strings.
, install new strings, adjust intonation for installed
strings, check for excess buzzes and test play the instrument. We
also clean and polish the instrument, oil the fingerboard, polish the
frets, lube the tuners (if applicable) and make any necessary electronic
repairs. If a buyer prefers we can do a custom set-up for their playing
style and choice of strings.
Keyboards:
Each keyboard is
initially inspected for performance. We then disassemble the unit
inspecting for battery leakage (common), condition (most keyboards
utilize a lithium battery for the memory which generally have a lifespan
of 3-7 years, and since most vintage keyboards are pre 1990 they almost
all need the batteries changed to function), corrosion, bad contacts
etc. We will thoroughly clean it inside and out. We then adjust /
replace / repair the key contacts, level the keys (if applicable
and when practical), check tune, replace any bad tines / reeds, repair
broken keys, do necessary case cabinet repairs, check electronics for
excess noise, re-solder bad jack connections, check foot control
functions, clean pots and controls, tune correctly and test play. Entire
unit is detailed to look as close to new as practical. Any keyboard that
cannot pass the above criteria after necessary, practical restoration
gets salvaged for parts.
Microphones:
We test each mic by ultimately going directly to
the element. As there are many different mic connector configurations
that both came stock and may have been modified by users, we
cannot guarantee that the mic will “out of the box” connect correctly to
your input. Most can easily be modified either by the end user or if
requested by us (a nominal fee will apply). Each mic is cleaned and
polished and it’s sound quality / operation condition noted.
Test Gear:
Test equipment is a varied department so the
tests / repairs we do to one is probably not applicable to another. Each
is cleaned inside and out to a practical amount. Each is tested
for function, calibration and accuracy. Tube testers have their internal
tubes checked, electrolytic caps checked / replaced, tube sockets
cleaned, controls cleaned and knobs tightened. O-scopes are checked
for basic function. Power supplies are checked for correct output and
regulation where applicable.
Electric Clocks:
Each clock is disassembled and thoroughly cleaned inside and out.
Mechanism is lubricated and checked for loose or non-working parts.
Motors are checked for freedom of movement and condition of windings,
brushes and bearings. AC cords are replaced and a fuse is sometimes
added where space will permit. Faces and hands are cleaned as well as
the inside of the dial crystal (glass). Finish touch-up are sometimes
made. Entire unit is detailed to look as close to new as practical.
Clocks are then re-assembled and checked over a 48 hour period for
accuracy. They are then bagged to await packing for shipment.
Due to limited resources we are only able to do restorations / repairs
on OUR OWN inventory
and unable to take OUTSIDE / CUSTOMER repairs.
If you need
work done to your gear,
TRY
SOME OF
THESE RESOURCES
WARNING:
PLEASE USE CAUTION WITH ANY ELECTRICAL DEVICE.
ANY REPAIR AND / OR
RESTORATION
SHOULD BE UNDERTAKEN ONLY BY A QUALIFIED TECHNICIAN. THE
TEXT'S BELOW
ARE NOT INSTRUCTIONS FOR DOING YOUR OWN REPAIR AND
ARE NOT
COMPREHENSIVE IN SCOPE.
*Amplifiers are
measured with .775 v, 1kHz Sine wave with amp at clip into a dummy load.
Amplifiers are each measured independently of each other.